
Introduction
Recently, I have started exploring and experimenting Vulkan’s Cubemap because I want to put the environment lights, skybox and reflection probe features into my Vulkan Game Engine. Admittedly, there are lots of tool online that can help you transform your equirectangular HDRI to cubemap HDRI [5], but I cannot put them into my game engine directly, so I started implementing my cubemap generator from scratch by using Vulkan.
Without any surprise, I encountered numerous pitfalls and I think one of the toughest one is the mapping rule that maps ‘Front’, ‘Back’, ‘Top’, ‘Bottom’, ‘Right’, ‘Left’ to ‘X+’, ‘X-‘, ‘Y+’, ‘Y-‘, ‘Z+’, ‘Z-‘.
It’s straghtforward after derivation but not intuitive at first. If you are not interested in the derivation details, then you can remember the following rules and skip the rest of this article:
TLDR
(1): Capture Front, Back, Top, Bottom, Right and Left faces by following the rotation rules in [1].
(2): Flip the ‘u’ texture coordinate (u_new = 1 – u_old) in the captured Front, Back, Right, Left textures.
(3): Swap the ‘u’ and ‘v’ texture coordinate in the captured Top texture.
(4): Swap the ‘u’ and ‘v’ texture coordinate in the captured Bottom texture first. Then, flip both ‘u’ and ‘v’ (u_new = 1 – u_old, v_new = 1 – v_old).
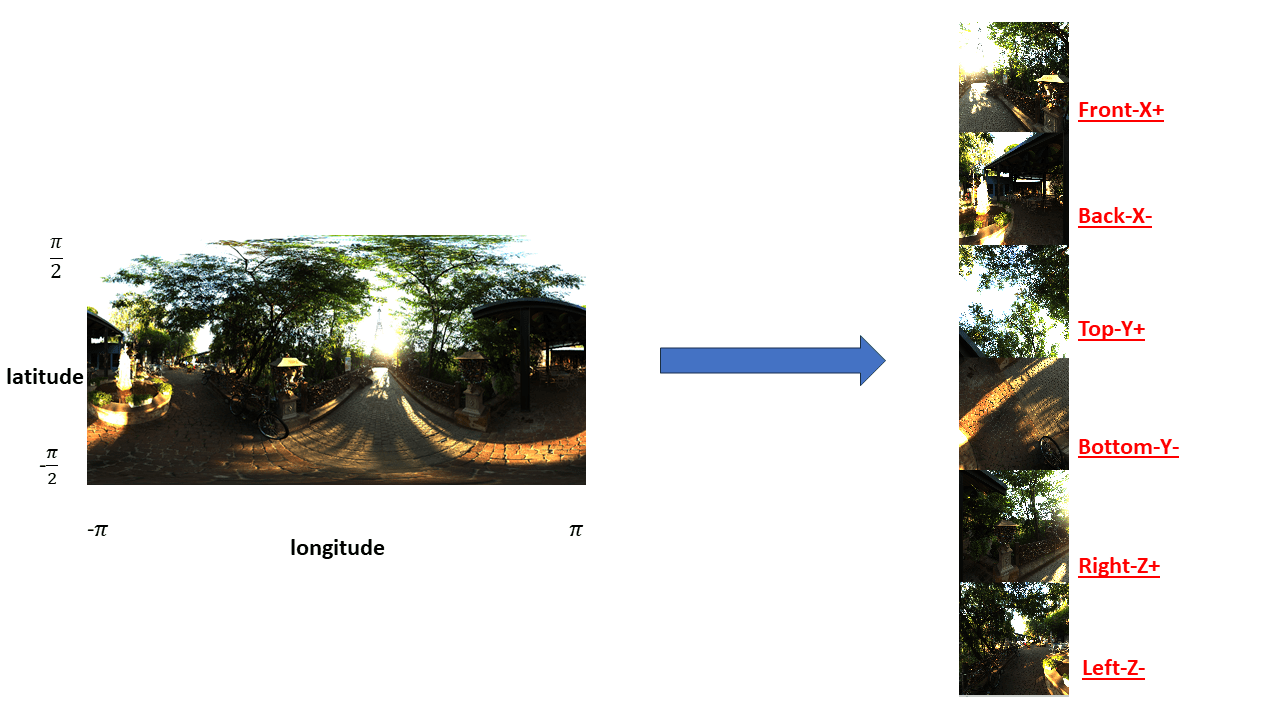
(5): Put newly generated textures into the cubemap texture’s layers sequentially: Front — X+ (layer 0), Back — X- (layer 1), Top — Y+ (layer 2), Bottom — Y- (layer 3), Right — Z+ (layer 4), Left — Z- (layer 5).
Note that the 6 faces are captured in a right-hand coordinate system and the cubemap is also sampled in a right-hand coordinate system. For both of them, X+ is front, Y+ is top and Z+ is right.
Theory and algorithm
There are two major docs that I refered. The first one is how to capture 6 faces [1] and the second one is the Vulkan Spec relating to cubemap sampling [2]. And I believe they are what we need to understand the algorithm under the hood.
Capture Front, Back, Top, Bottom, Right and Left — 6 faces

For details, please refer to [1], I just summarize what you need to do to generate the 6 faces.
- Camera’s vertical fov should be same as the horiztonal fov, which are 90 degree.
- Capture Front (by default, no need to rotate this one), Right, Left, Back by only rotating camera’s view direction around the up axis. (The view direction starts at the forward axis)
- Capture Top by only rotating camera’s view direction around the x axis clock-wise 90 degree. (The view direction starts at the forward axis)
- Capture Bottom by only rotating camera’s view direction around the x axis counterclock-wise 90 degree. (The view direction starts at the forward axis)
If you capture the cubemap from your virtual scene, then you are good now, but if you want to sample the equirectangular HDRI, the above steps can only give you sampling direction vectors in your fragment shader. As a result, you may want to map your samping direction vectors to uv coordinates to sample the 2D HDRI.
In short, you can find longtitude-latitude coordinates for these samping direction vectors since the x-y-z coordinate system can be replaced by a sphereical coordinate system. For more details, please refer to [1].
I implemented [1] in my tool [3]. I choose positive y (forward) as the longtitude 0 axis but the author of [1] chose positive x (right) as the longtitude 0 axis.
Here is my fragment shader to sample the 2D HDRI
void main()
{
    float width = i_sceneInfo.widthHeight.x;
    float height = i_sceneInfo.widthHeight.y;

    // Note: The app assumes a 2x2x2 box.
    // Get the point position on the face in perspective image.
    float i = gl_FragCoord.x;
    float j = height - gl_FragCoord.y;
    vec3 p = vec3((2.0 * i / width) - 1.0, 1.0, (2.0 * j / height) - 1.0);

    // Rotate the position around different axises to get the desired point position.
    mat4 rotMat = i_sceneInfo.rotMats[inViewId];
    vec4 p_prime = rotMat * vec4(p, 0.0);

    // From a world position, we can derive it's sphereical coordinate system's coordinate.
    float longitude = atan(p_prime.x, p_prime.y);
    float latitude = atan(p_prime.z, sqrt(p_prime.x * p_prime.x + p_prime.y * p_prime.y));

    // Transform the sphereical coordinate system's coordinate to UV texture coordinate.
    float I = (longitude + M_PI) / (2.0 * M_PI);
    float J = (latitude + M_PI / 2.0) / M_PI;

    vec2 uv = vec2(I, 1.0 - J);

    vec4 cubemapColor = texture(hdriTexture, uv);

    outColor = cubemapColor;
}
Remap Front, Back, Top, Bottom, Right, Left to X+/-, Y+/-, Z+/-
After we get 6 surfaces, we still cannot directly use them in Vulkan cubemap, because the Vulkan’s cubemap sampling algorithm is different from how we capture the surfaces.
For a 2d texture in Vulkan, top-left is the origin and right and down are positive directions for u and v, which is shown below.

When we captured 6 faces, there orientations are shown below. Ideally, when we sample or render the cubemap in vulkan by using a 3D vector, the cubemap is sampled exactly same as how we capture it, which is also same as the image below.

However, Vulkan has its own rules [2]. Firstly, Vulkan selects the surface according to the largest absolute value element in the 3D vector (E.g. [0.1, 0.1, -0.8] means Vulkan selects the Z- face). Then, Vulkan samples the selected 2D texture by using s-t coordinates instead of u-v.
Thus, to make your cubemap rendering seamlessly, you have to map your uv surfaces to st surface.
For example, on the Front face, if we have a point/sample direction [1, 1, 1] in the world space, we hope that it samples the u=1, v=0 in the Front texture. However, according to the rule below, its s=0 and t=0, so it samples the u=0, v=0 of the Front face. As a result, the upper-right corner of the rendered Front face has the color of the upper-left corner’s color and the Front face is flipped.
Therefore, to offset this effect, we can horizontally flip the original Front face beforehand to generate a new Front face texture for sampling so that when s=0, t=0, it samples the original Front face’s u=1, v=0 point.
This is the idea under the derivation below. For brevity, you have to swap/flip uv to let it match s_face and t_face in the illustrations respectively.


My GLSL code to remap 6 faces
void main()
{
    float width =  screenInfo.widthHeight.x;
    float height = screenInfo.widthHeight.y;

    vec2 uv = vec2(gl_FragCoord.x / width, gl_FragCoord.y / height);

    if((inViewId == 0) || (inViewId == 1) || (inViewId == 4) || (inViewId == 5))
    {
        uv.x = 1.0 - uv.x;
    }
    else
    {
        // TOP
        if(inViewId == 2)
        {
            // Swap
            float tmp = uv.x;
            uv.x = uv.y;
            uv.y = tmp;
        }
        // BOTTOM
        else
        {
            // Swap
            float tmp = uv.x;
            uv.x = uv.y;
            uv.y = tmp;
            // Flip both uv
            uv.x = -uv.x;
            uv.y = -uv.y;
        }
    }

    vec4 cubemapColor = texture(cubemapTextures[inViewId], uv);

    outColor = cubemapColor;
}
Vulkan Implementation
I made two tools as my experiment ground and code reference. One is a cubemap generator[3]. Another one is a cubemap renderer[4]. The cubemap generator will be maintained and it’s intended for convenient usage. So, please let me know if it is hard to use. As for the cubemap renderer, it is just an code example. It should be easy to hack and you can find that it reads a hdr file called little_paris_eiffel_tower_4k_cubemap.hdr under the data folder, which is fixed in the example.
One thing that I want to mention is a trick that I used to generate rays for each pixels to sample the 2D hdri or the cubemap. I don’t draw a cube. Instead, I only draw a quad covers the whole screen. Thus, after rasterization, you can get each pixels’ screen coordinate in the fragment shader. Then, the screen space coordinates can be remapped to coordinates in any space (Like the world space since both of the spaces are linear and not skewed).
Here is the VS GLSL code shared between the two tools
#version 450

#extension GL_EXT_multiview : enable

layout (location = 0) flat out int outViewId;

vec2 positions[6] = vec2[](
    vec2(-1.f, -1.f),
    vec2( 1.f, -1.f),
    vec2(-1.f,  1.f),
    vec2( 1.f, -1.f),
    vec2( 1.f,  1.f),
    vec2(-1.f,  1.f)
);

void main()
{
    outViewId = gl_ViewIndex;

    gl_Position = vec4(positions[gl_VertexIndex], 0.5, 1.0);
}
Cubemap Generator
The cubemap generator reads in a 2D equirectangular and generates a 2D HDRI which can be directly loaded into Vulkan’s cubemap.
It should be easy to build and read, but I also packaged it in case anyone who is not interested in the details and just want a usable tool. It can be found in the github release of the tool[7].
Here is an example command to use the tool:
../..>SphericalToCubemap.exe -h
  SphericalToCubemap.exe {OPTIONS}

    This tool takes an equirectangular image as input and output the cubemap. If
    the input is ./img.hdr. The output will be ./img_cubemap.hdr

  OPTIONS:

      -h, --help                        Display this help menu
      -i, --srcPath                     The input equirectangular image path.

    E.g. SphericalToCubemap.exe --srcPath ./img.hdr

../..>SphericalToCubemap.exe -i "C:\JiaruiYan\Projects\OneFileVulkans\Tools\SphericalToCubemap\little_paris_eiffel_tower_4k.hdr"
Read File From: C:\JiaruiYan\Projects\OneFileVulkans\Tools\SphericalToCubemap\little_paris_eiffel_tower_4k.hdr
Device name:AMD Radeon RX 6800 XT
The image has elements that are larger than 1.f.
Found proper output data.
Cubemap saves successfully.
You can give it an hdri through its -i flag. The tool will save the cubemap called output_cubemap.hdr under the same folder as your input. The title pic of this post is an example.
Cubemap Renderer
You can find the cubemap renderer here [4] [7]. Here is an example:
You can use your mouse’s middle button to control the camera’s view.
References
- http://paulbourke.net/panorama/cubemaps/cubemapinfo.pdf
- https://registry.khronos.org/vulkan/specs/1.3/html/chap16.html#_cube_map_face_selection_and_transformations
- https://github.com/JerryYan97/Vulkan-Samples-Dictionary/tree/master/Tools/SphericalToCubemap
- https://github.com/JerryYan97/Vulkan-Samples-Dictionary/tree/master/Samples/3-02_PBREnivBasic
- https://github.com/dariomanesku/cmftStudio
- https://learnopengl.com/Advanced-OpenGL/Cubemaps
- https://github.com/JerryYan97/Vulkan-Samples-Dictionary/releases
